


I gave a brown bag talk about user story mapping recently at Emarsys. After a bit of promotion, more and more of our teams started to use this method, so this was a good occasion to review why we like it, share some learnings, and show some basic guidelines and principles to consider when using it.
As user story mapping is a very general method, I do recommend everyone interested in the method to read the excellent book by Jeff Patton on the topic.
It turns out that when working with similar teams inside one organization, it’s not really useful to always say “it depends on your team/product/problem” to whatever questions people have. There are more similarities than differences between the teams, and people would like to have more concrete recipes to get started. Because of this, I decided to talk about some baseline ideas and introduce a kind of fixed process, while still leaving room for people to iterate and customize as they need. So here are my basic ingredients for using user story mapping.
About the Houses…
One of the toughest things in introducing new methods is to actually convince people to participate. Even more so with user story mapping, as the biggest advantage of the method is not the actual map that is being created, but rather the shared understanding formed through discussions within the team. Maybe the maps they have already seen were not as impressive or they didn’t consider it as useful. Some may consider this time spent “not working” (=talking) as wasteful. So my first point was to do a short exercise. I asked people present to grab a post-it, and draw a house in 1 minute.
I really liked the results. There was a wide variety of houses, with different windows, doors, chimneys, some had drawn additional trees, sun, or smoke. Such variety, such diverse ideas.
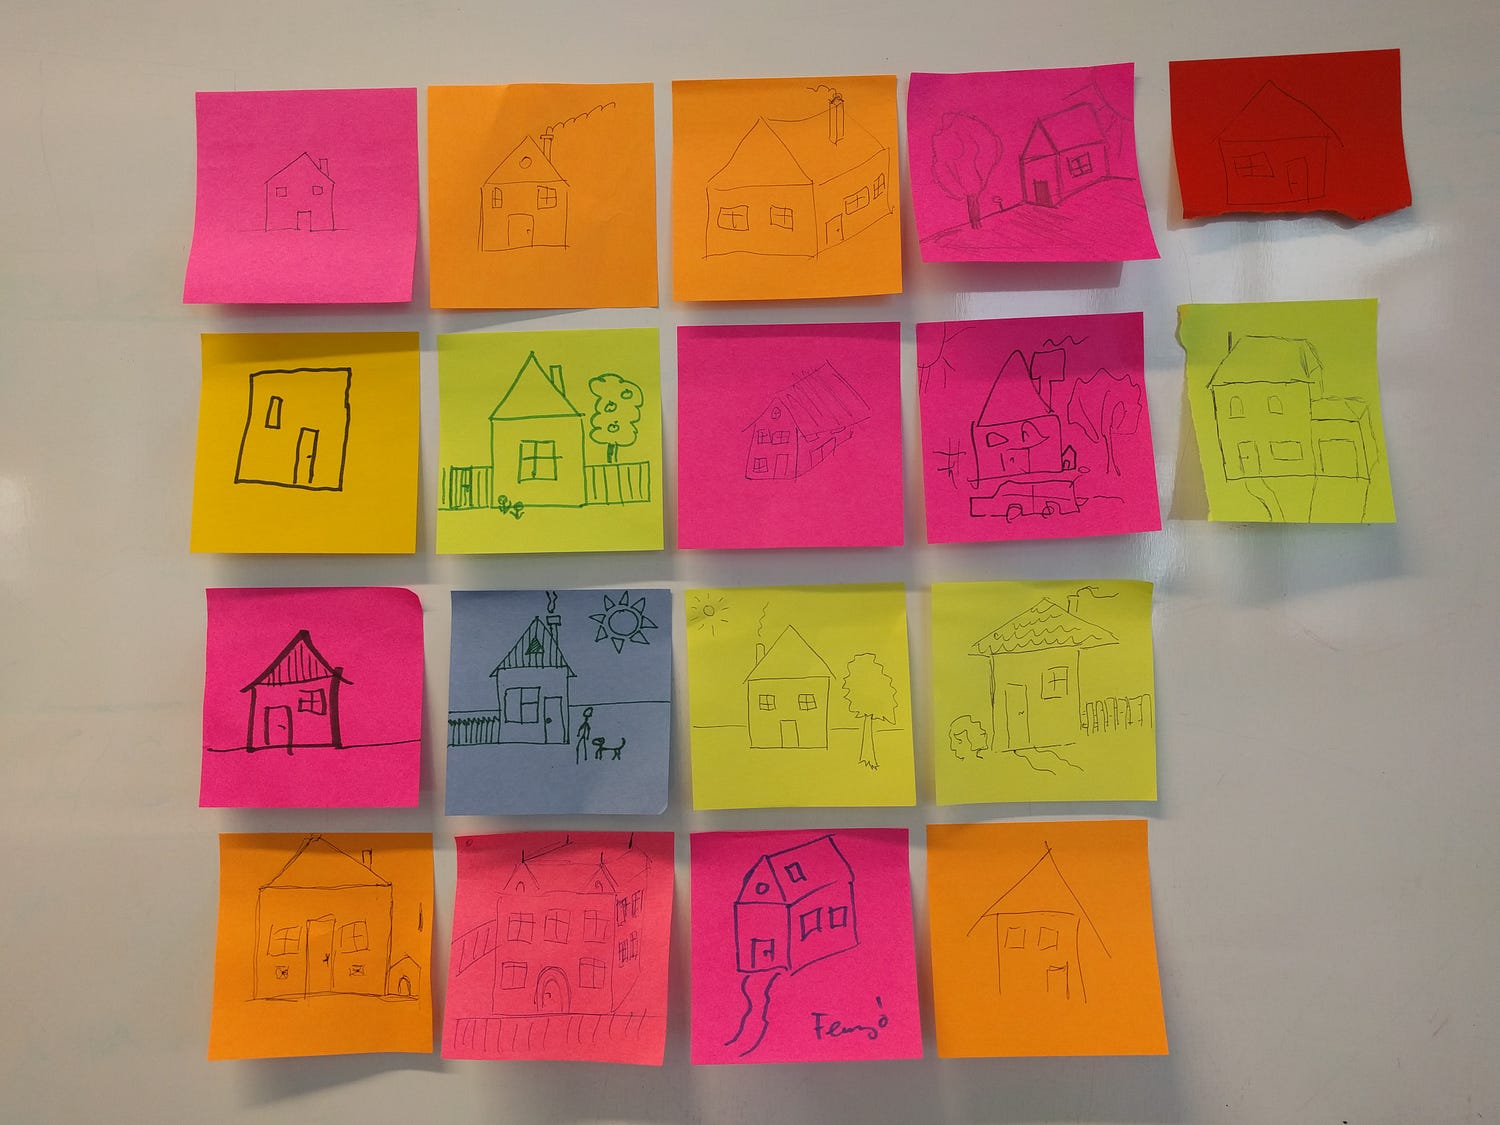
This was not a perfect analogy, I cheated a bit. Usually when creating software you have more details on what to do, and most of the time you also have to collaborate with others so you have to care about how your work fits with others’. But this wasn’t a big cheat, as it drove home the point: you shouldn’t assume everybody agrees what you are working on, and you should see how your tasks fit into the big picture.
You need to spend time on getting shared understanding.
Mapping for Shared Understanding
Building shared understanding is not easy, but it’s also one of the more valuable things UX people can do to help their product team. User story mapping is a pretty great way of achieving this, especially when you are in the product definition phase.
- User: since you want look at the user perspective. Avoiding this or making the discussion technical will result in a conversation too low level, and creates a distance between the team and the purpose of the product. It also puts the overall goals into the focus and keeps the team from discussing too many details
- Story: even with looking at the user’s perspective, having a continuous flow is not guaranteed. Without something to provide an overview, the product will have gaps in the user flow and it will create a fragmented and overall bad experience. With a clear story, a narrative, the product gaps and blind spots to the team can be discovered and covered.
- Mapping: while the result is useful in itself, the verb “mapping” here is even more important. The process of the product team creating the map together provides a space for the kind of discussions that help the most with creating a shared understanding. Different perspectives and ideas from the team members have a chance to surface, to be understood, and to be included in the plans.
But the result map is not shared understanding in itself. As Jeff Patton describes in his book “User Story Mapping,” it’s more like a vacation photo. It’s an artifact that reminds the team members on the shared understanding they built together while creating the map. It also provides the narrative context to later remember the details that were discussed.
Anatomy of a Story Map
Story maps are pretty straightforward, once somebody sees one, they will understand how it works. Besides the main body (the spine and the meat) it may contain additional information related to the product around, like research info about the users, technical questions, UI sketches, UX goals, progress on the project, additional ideas and decisions that were made, phase goals.
It will look something like this:
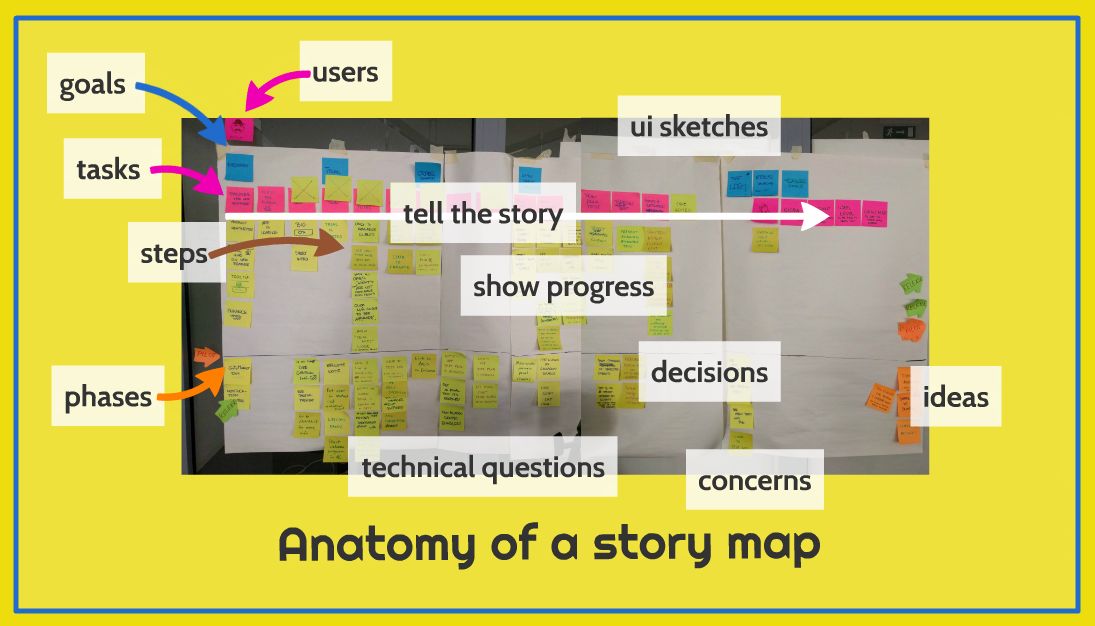
We define the names and the meaning of the different levels from the main body of the map in a set way. This helps the teams while creating the map to stay on the same level of discussion. It also helps people from other teams to better understand what they see, and make connections between different products.
- Goals are on top (blue sticky notes). These are the things the user would want to achieve while using the product, grouping activities the user would do with the product while trying to do something. Goals may relate to different people working with the same product, like a creator and a manager. Goals should have a clear connection to business / product goals.
- Tasks are in the middle (pink sticky notes). These are actions that ideally a user would do at once without interrupting to do something else. Tasks should be always formulated with verbs to focus on the users’ actions.
- Steps form the main body of the map (yellow sticky notes). They should be the smallest reasonable pieces for the users while finishing their tasks. It can include optional and alternative routes too. Steps should be always formulated (starting) with verbs, to focus on the action.
Goals and tasks should be something that also makes sense from a higher perspective, as they form the spine of the product. They should be relatively fixed, independent from the actual solutions the product team will opt for.
Steps are similar in size to the user stories (as in agile user stories), that a developer could start to work on. Steps may include technical information too, like the system doing something, but only if it’s not a direct response to an interaction and make sure to keep the number of such cards low, as this is not the place for technical planning.
Formulating the conceptual size of each card is hard even with these guides. If something generates lots of discussions, it most probably needs to be broken down into smaller pieces. It can also happen that something is starting out as a step, but later turns out to be a task. But don’t worry too much to get an even size distribution, what the user does also differs in size and importance. It’s more important to get clarity on what is written on the cards.
The final component is the narrative flow that connects the cards. If a left-right, top-down retelling of the story based on the map does not make sense, your product has gaps that will result in a bad experience.
Build a Story Map
We tried a few variations to building a story map, based on which I recommend the following steps.
1. Preparation
- You will need the usual stack of sticky notes, pens, flipchart papers (the stickies go onto this, so you can move your map later). Book a suitable room (has enough wall space). Choose a workshop lead to facilitate (may be a member of the team, but her job will be harder to focus on the content of the discussion, and to keep the discussion going).
- Invite your team: 6–7 persons ideally, product manager, tech lead and UX people at least, and you should also add the other developers from the team (remember, you are going to work on shared understanding). Book their calendars (9am-5pm), and ask to cancel their other meetings, disrupting the discussion time will break the focus.
- The length of the workshop varies, but our rule of thumb is to plan with as many half days as many months you expect your project to last (so a 1 day workshop for a 2 month project). This also has the consequence that if the story mapping lasts for 2 days, your project will be approximately 4 month long, even if you expect it to be less. A good time to start narrowing the scope.
- Finally, when you should do a story mapping. Beginning of the cycle is the best, once the team has an understanding of the problem space. Also if your project seems stuck, like you have many discussions around when will something be done and what should be done at all, that is a good time to take a step back and create a story map.
2. Introduction
It’s 9 pm, your story mapping session starts now. Spend some time to let everybody get to know the problem space.
- Have the product manager talk about the business and product goals and the product vision.
- Have the UX people share any insights into the users’ needs and expectation.
- If there is anything done already, like a journey map review it too.
You should be sure that everyone in the room understands the purpose of the product to be created, any big constraints that may affect the execution, and also who will be using the product.
3. Brainstorm tasks
Start with the purple sticky notes, everybody works alone and answers: What would the user do with the product?
- Think about the activities that the user would do without interruption.
- Use verbs to describe the actions the user does.
- Think about the different users who would use the product, are there any differences?
Writing up the tasks should take around 5–10 minutes, once done put up the sticky notes to the wall and introduce them. If somebody doesn’t understand a description it should be clarified until you have consensus.
4. Group and sort tasks, create goals
Now that you have a bunch of sticky notes, group and sort them together, this creates the “spine” of the map. You would want have lots of discussions in this part to make sure the team agrees on the flow.
- First merge notes that refer to the same thing, also you may need to reformulate some.
- Group the ones that refer to a similar thing (like similar user doing something similar or connected).
- Name the groups according to what the user would try to achieve. These will be the goals (blue sticky notes).
- Order the goals, and within the goals the activities to form a probable flow, actions happening after each other. Most likely there will be several ways this could be done, so choose an order that is the most probable.
- Try to tell the story from left to right to see if it makes sense, and you didn’t leave a gap.
There may be tasks that can be placed into several groups. Don’t worry about it too much, just put it into the group where it makes the most sense.
5. Create steps
This part will take the longest (around 2/3 of the time). For each task, brainstorm together what are some of the steps the user would do to complete the activity. The steps form the columns below the tasks (the “meat” of the story map).
I prefer to have short (5 minutes) brainstorming sessions alone, followed by discussions together. This approach takes quite a long time and needs to have disciplined facilitating. On the other hand, it also provides the most ideas and helps with making sure everybody understands the same thing under a term. Alternatively you can just discuss the steps together, this is faster, but may lead to group thinking and unsaid assumptions.
How to write these stories?
- You don’t need to follow a template (don’t be a template zombie), but make sure to use verbs to focus on the user actions (rather than on features that would exclude the possibility of finding better solutions).
- These are approximately the same granularity that the user stories used in technical planning.
There can be alternative and parallel steps, just start new columns below the task to separate them.
One way of finding missing steps here is asking questions starting with “what about?”. These will open up missing steps and new alternatives.
At this point you may notice that the map is getting bigger and bigger into directions that were unexpected. This doesn’t mean your product scope got bigger, only that your understanding on what needs to be done got better. Also not everything will be done that gets on the map, but they will provide valuable info on connections, alternatives not chosen, and ideas to be acted on in later iterations.
6. Prioritize steps
The higher the sticky note, the more important for the user to do it, so she is able to complete her task and reach her goal. This is the fastest part, but usually generates the most discussions.
7. Slice up phases
Once you have all your steps, you are ready to decide together when you want to build parts of your product, what are the phases. You should have already a good idea what your product release goals will be, like what your MVP/MLP should achieve based on the business goals. Each phase corresponds to a release or a milestone.
Once you set your phases, you can draw a line between the steps. Above the line: this will be done in the current phase. Below the line: this will be done in the next phase.
While at this point the team is usually tired (you created a whole story map after all), it’s critical everybody participates. PMs and UX should make sure each release achieves its goal and supports a good user outcome, while developers should be clear what seems achievable (within reason, since this not technical planning yet).
8. Review
Review together the whole flow: each step should have its place within the task, and each task should have its place within the goal, and everything together should form a coherent narrative. You can still move, split, and rename cards as needed.
9. Use
Once done, you should put the map on the wall near your team, so everybody remembers what was discussed. I like the term “information radiator” (coined by Alistair Cockburn), such a story map distributes knowledge constantly, further reinforcing shared understanding.
- UX people can use the map to start creating the design concept.
- Developers can use the map as the basis for technical planning.
- The team can follow their progress by adding small notations to the cards.
- The team can do standups before the map, getting a clear answer on “Did we make any progress on our overall objective?”.
- Ideas, decisions and sketches can be added to the map or posted nearby, adding to it’s information density.
We found maps also useful to help other teams and executives understand the strategy the team is taking.
Start Mapping
User story mapping is a versatile tool, but it only helps if the team commits to actually using it. Patton describes several ways it can be fitted into a team’s toolbox, and as a more general method story mapping can be used to plan, describe or simply visualize any activity. But as with any tool, it will be only useful if the team has problems to be solved.
And what about the houses? They won’t be built by themselves, so start mapping now!


